
Host Setup & Flashing
This phase prepares the host PC environment, extracts the pre-built L4T Oppila image, and flashes it to the AstrOptix Board V2 via recovery mode.
Install Dependencies
Note
Skip step 1 if you have already installed the dependencies on the host machine.
Step 1: Update Package Lists and Install Required Packages
sudo apt update
sudo apt install -y qemu-user-static sshpass binutils abootimg libxml2-utils nfs-kernel-server u-boot-tools android-tools-fastboot python3-pip lz4
pip3 install -U pip
Prepare Working Directory
Step 2: Download Required Files
Download OPPILA_ORIN_L4T_36.5.0_ASTROPTIX.tar.bz2 provided by the Oppila Support.
Step 3: Create a Working Directory
mkdir ~/OPPILA_ORIN_L4T_36.5.0_ASTROPTIXStep 4: Move the Downloaded Image
mv ~/Downloads/OPPILA_ORIN_L4T_36.5.0_ASTROPTIX.tar.bz2 ~/OPPILA_ORIN_L4T_36.5.0_ASTROPTIX/Step 5: Navigate to the New Directory
cd ~/OPPILA_ORIN_L4T_36.5.0_ASTROPTIX/Extract the OS Image
Step 6: Extract the Archive
Run the following command. Extraction may take several minutes:
sudo tar -xvJf OPPILA_ORIN_L4T_36.5.0_ASTROPTIX.tar.bz2Once complete, a directory named Linux_for_Tegra will be created inside the extracted folder.
Step 7: Navigate to the Extracted Directory
cd Linux_for_Tegra/Set Recovery Mode
Step 8: Recovery Mode Setup
On the AstrOptix AI Carrier Board V2, short J7 Pin 3 (GND) to J7 Pin 4 (FORCE REC) using a jumper wire, as shown below.
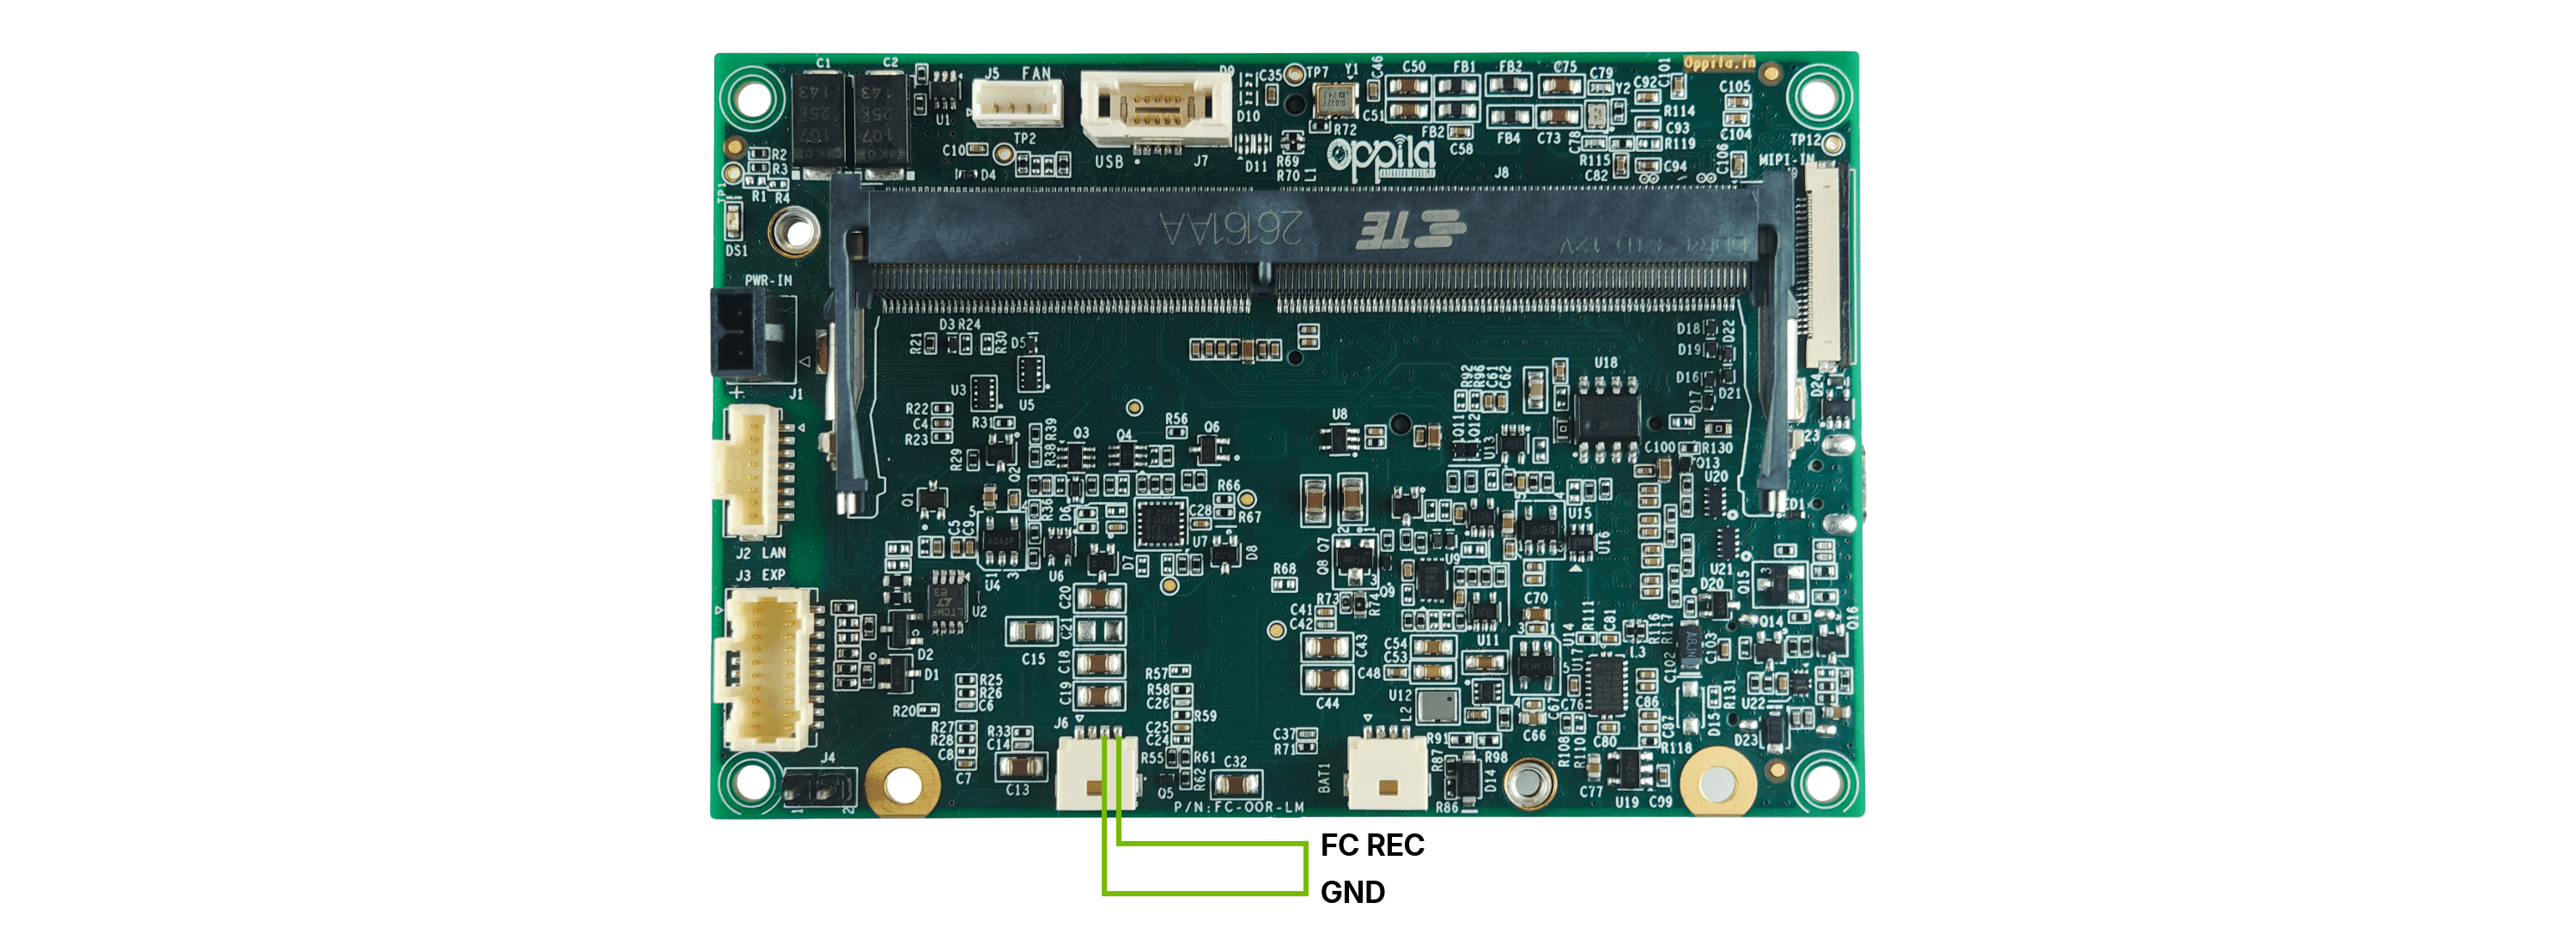
After placing the jumper:
- Connect the Jetson Orin Nano/NX module to the AstrOptix AI Carrier Board V2.
- Insert an NVMe SSD into the M.2 Key M slot (J14).
- Connect a USB Type-C cable from J11 to the host PC.
- Power on the board using the provided adapter.
Verify Device Detection
Step 9: Check Jetson Orin Nano/NX is detected in Recovery Mode on Host PC terminal
lsusbLook for an entry such as: NVIDIA Corp. APX
Note
If the device is not visible, try a different USB cable or ensure jumper is placed in FC REC and GND pins.
Flashing Image
Step 10: Execute the below command to flash image from Host PC to Jetson Orin Nano/Nx
sudo ./nvsdkmanager_flash.sh --storage nvme0n1p1A successful flash is shown in the image below:

Note
The flashing may take around 10-15 minutes.
Post-Flash Setup
Once flashing is complete:
Power off the AstrOptix Board V2 and disconnect the power cable.
Remove the jumper from the J7(3rd and 4th pins) recovery mode pins.
Connect your camera to the AstrOptix Board V2:
- LVDS camera → J13 connector (bottom side)
Power on the AstrOptix Board V2 with Orin Nano/NX Module.
OEM Configuration Setup
On first boot, you will be guided through the following steps:
- Language Selection — Choose your preferred language.
- License Agreement — Accept the terms to continue.
- Networking — Configure Ethernet or Wi-Fi if needed.
- User Account — Create your NVIDIA account credentials.
- Password — Set a secure password for your account.
- Review & Finish — Confirm your settings and complete setup.
Once done, the device will boot into the NVIDIA Desktop Environment.